

Placemats make a dramatic addition to your table settings, all while being very practical. They cushion your dishes while you’re using them, and protect your table and counter surfaces from scratches or minor spills.
One fabric can inspire a whole tablescape mood: the metallic splatter cork that Jess chose, brings the galaxy right into your home. Add a bit of northern lights to your own table!
Select eye-catching cork fabrics to make each placemat one-of-kind! Minimal sewing is ideal for a beginner sewist, and keeps the fabric center-stage. Create a whole set as a beautiful housewarming gift. Shop our selection of Cork Fabric here, or browse our Luxe Faux Leather for a chic alternative look.
Here are the pattern details before we get started:
- Finished Size: 12" diameter
- Recommended Fabrics: cork, faux leather, or fabric that doesn’t fray
- Yardage: 25" wide by 12" (for one placemat)
- Helpful Notions: 40 wt. polyester thread, optional metallic serger thread, scissors, basting spray, tape, or glue, removable pen or chalk, ruler, large piece of paper
CUTTING INSTRUCTIONS
Main Fabric: Cut (2) 12" squares
SEWING INSTRUCTIONS
1. Fold the paper into quarters, aligning raw edges. Measure and mark 6" from the double fold corner, creating an arc on the top paper layer. Cut through all paper layers following the marked curve. Unfold the paper for your pattern piece. (Photo 1a–1h)


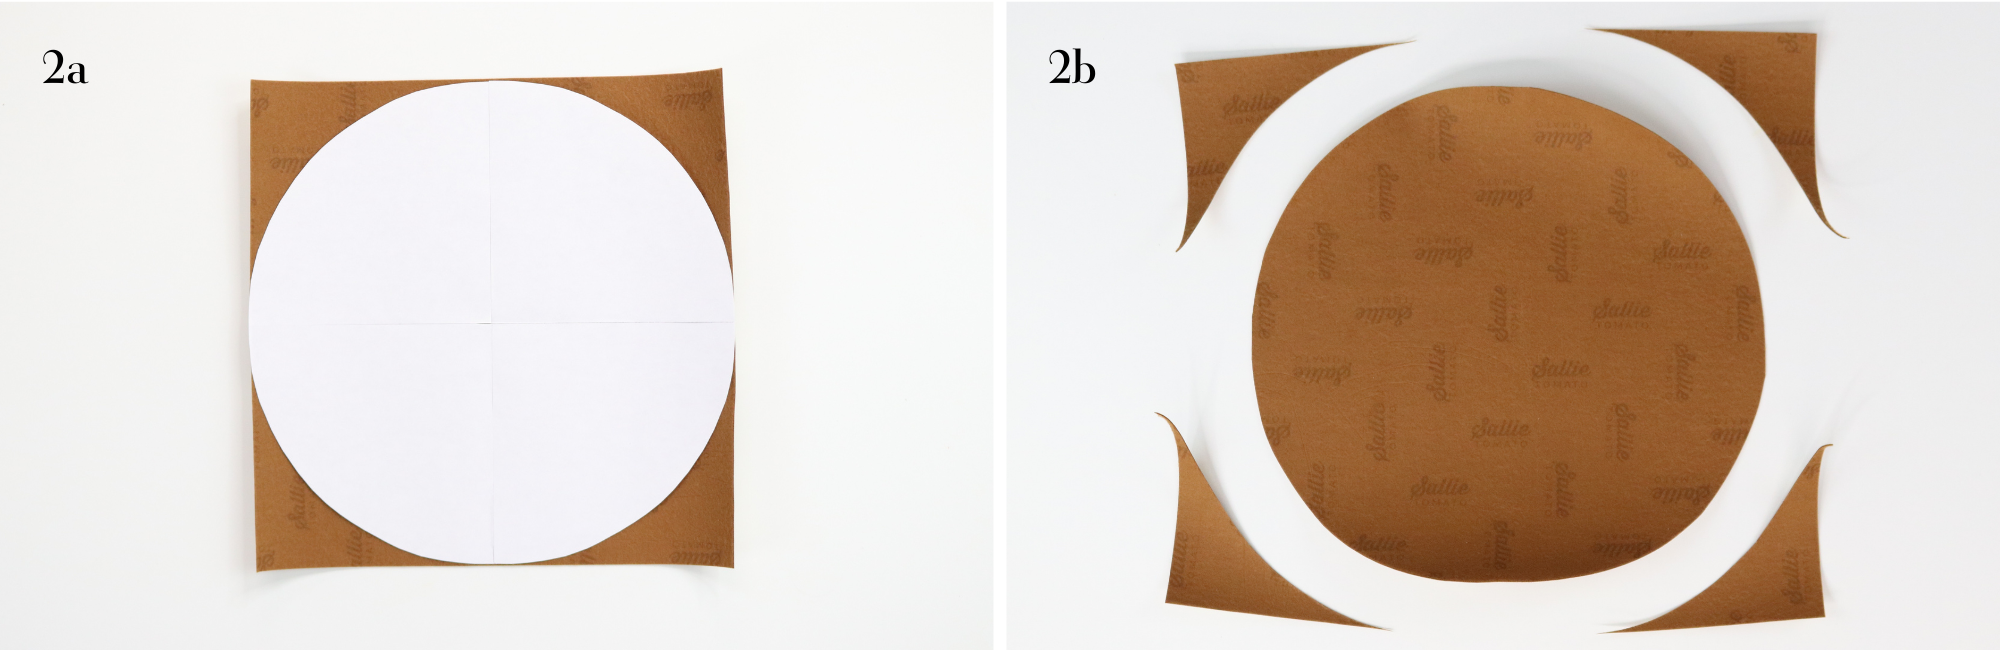
2. Place the paper pattern, centered, on the Wrong Side of one Main Fabric square. Cut out the circle following the pattern edge. (Photo 2a and 2b)
3. Apply basting tape, glue or spray to the Wrong Side of the Main Fabric circle. Center on the Wrong Side of the remaining Main Fabric square, press in place. (Photo 3a, 3b and 3c)

4. Topstitch around the raw edge of the Main Fabric circle with 1/4" seam allowance. Then cut away the bottom layer of fabric even with the top circle. (Photo 4)

Optional: for an interesting edge finish, try overlocking the placemat edge, you can trim away the bottom layer of fabric at the same time with the serger blade engaged.

Be sure to watch Jess’s tablescape tutorial using quick cork placemats here on our YouTube Channel.
Enjoy, and have a great day!
Kate from Sallie Tomato


Leave a comment